The Eyes of Beauty - Starfield Edition
Autor:LogRaamLast updated:10/10/2023 00:22:33306.3K307.5MB


Mod Introduction
This mod adds new textures for your character's eyes. It is not a direct port from the original Skyrim or Fallout mod, but a new version of TEOB made specifically for Starfield.
THE EYES OF BEAUTY - STARFIELD EDITION
Starfield Original Mod
QUICK INSTALLATION GUIDE:
1. Download the TEOB Textures Installer tool. Extract it to a folder of your choice.
2. Download any extra Texture Packs you want from Optional Files, then extract them into the Textures folder of the Installer Tool.
3. Run the installer tool and follow the steps listed.
4. Select the textures you want, then click Apply.
Enjoy!
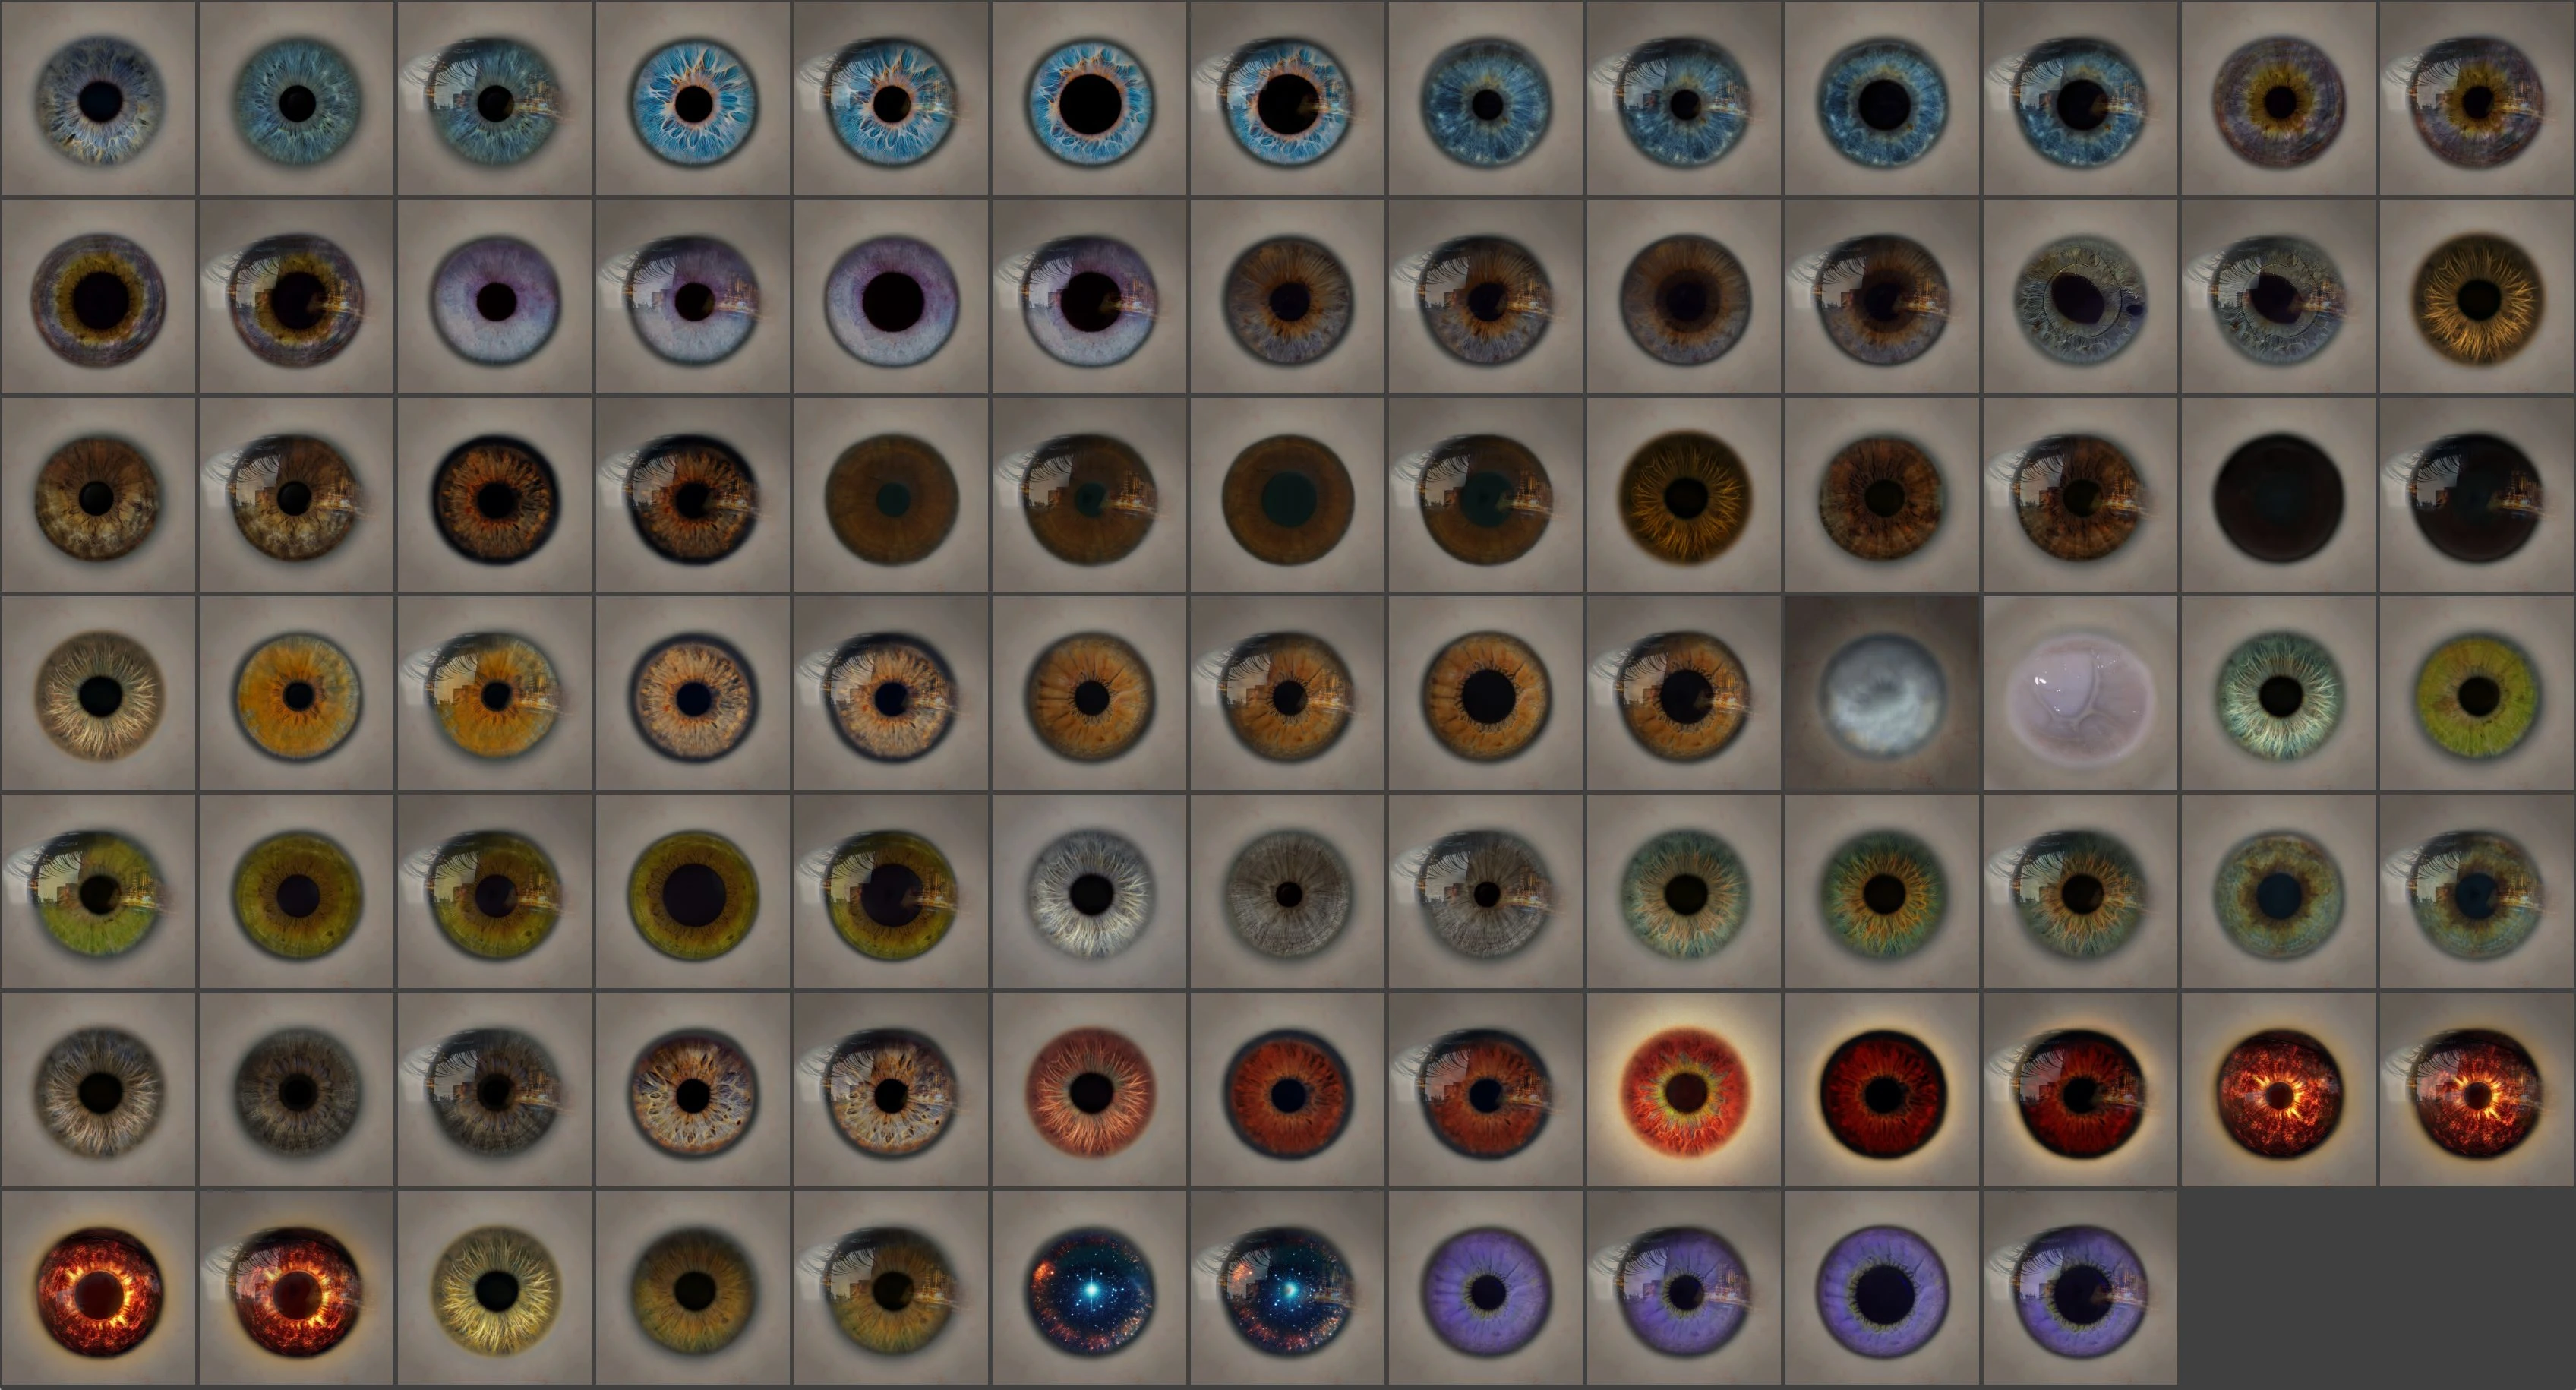
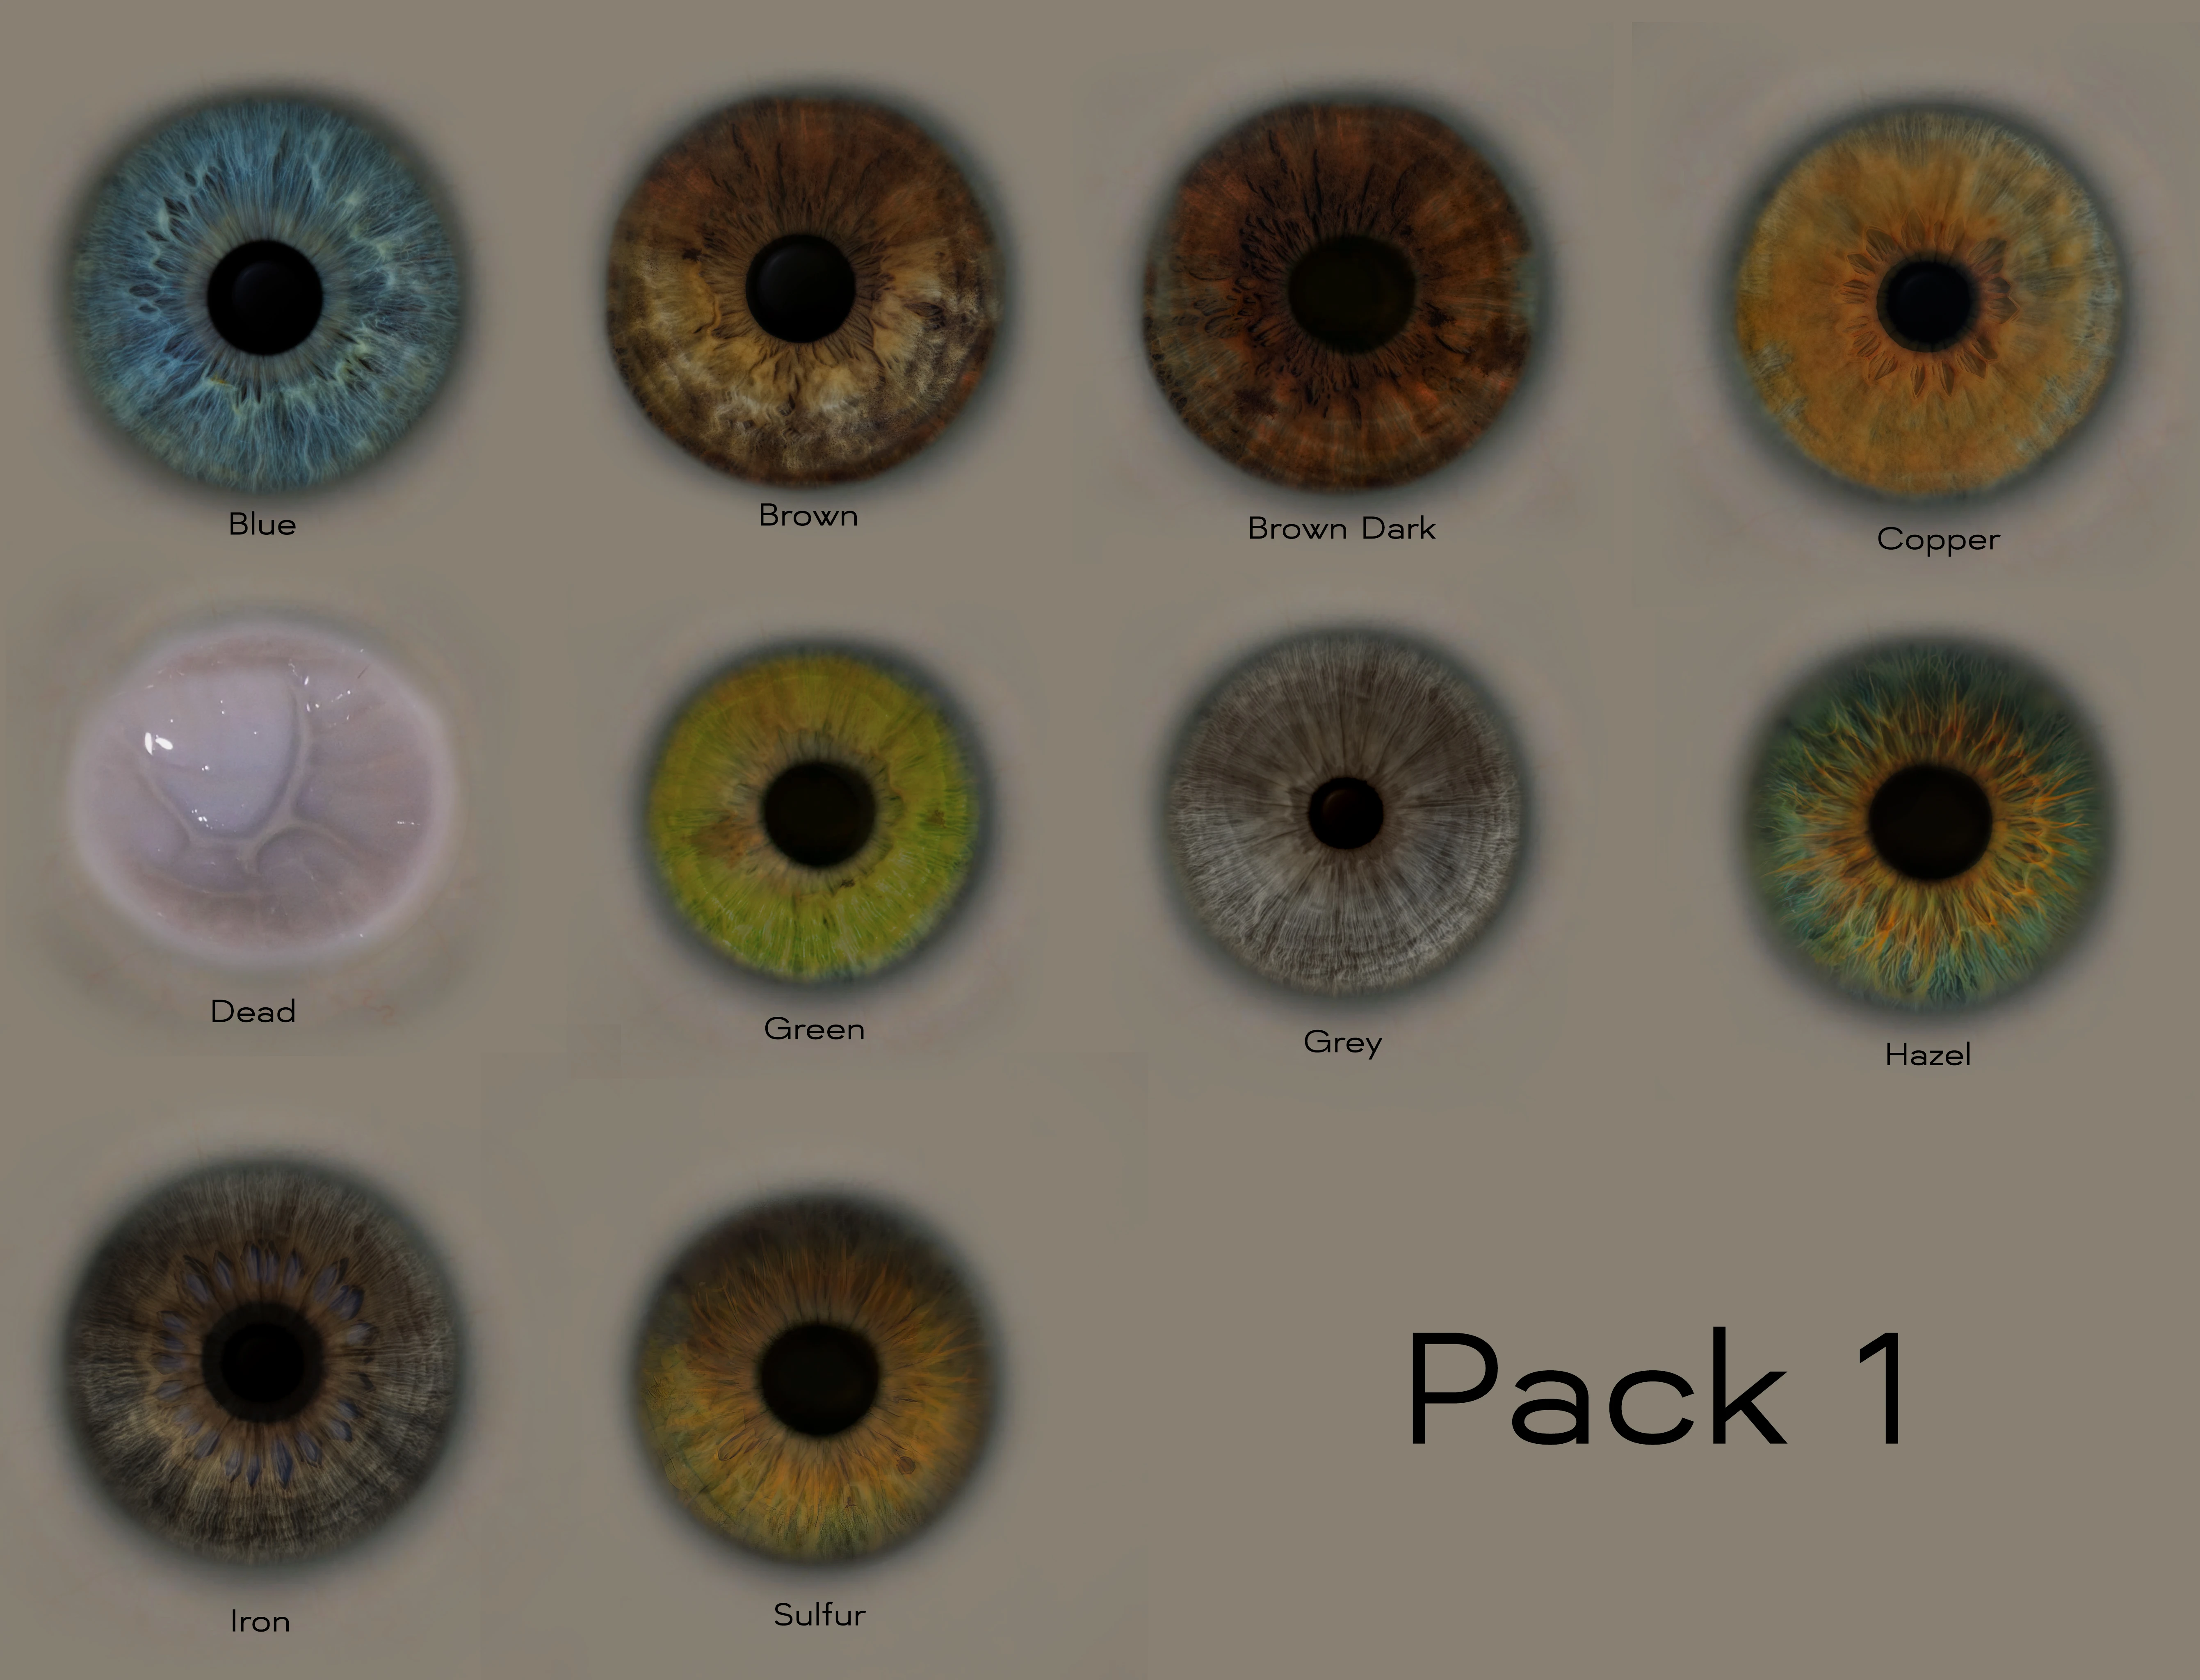
For this initial version, I offer new eye textures to replace the vanilla ones.
More textures will be added soon.
The textures will be fully integrated into the game once the Creation Kit supports adding new archives. Until then, The Eyes Of Beauty will provide replacement textures.
*This mod fixes the 'blue sclera opacity' effect found on the vanilla eyes.*
Feel free to share your images and videos to show us what this mod brings to your game.
Don't forget to TRACK This mod because it will be regularly updated with new textures.
ABOUT SHARING PRESET WITH TEOB
Yes, of course, you can share your presets using this mod, and I encourage it! The only thing I ask is not to include the textures directly in your archive but rather to provide a link to The Eyes of Beauty so that players can download the textures from this page.
A Note from the Author:
I hope you enjoy the result as much as I enjoyed working on this project.
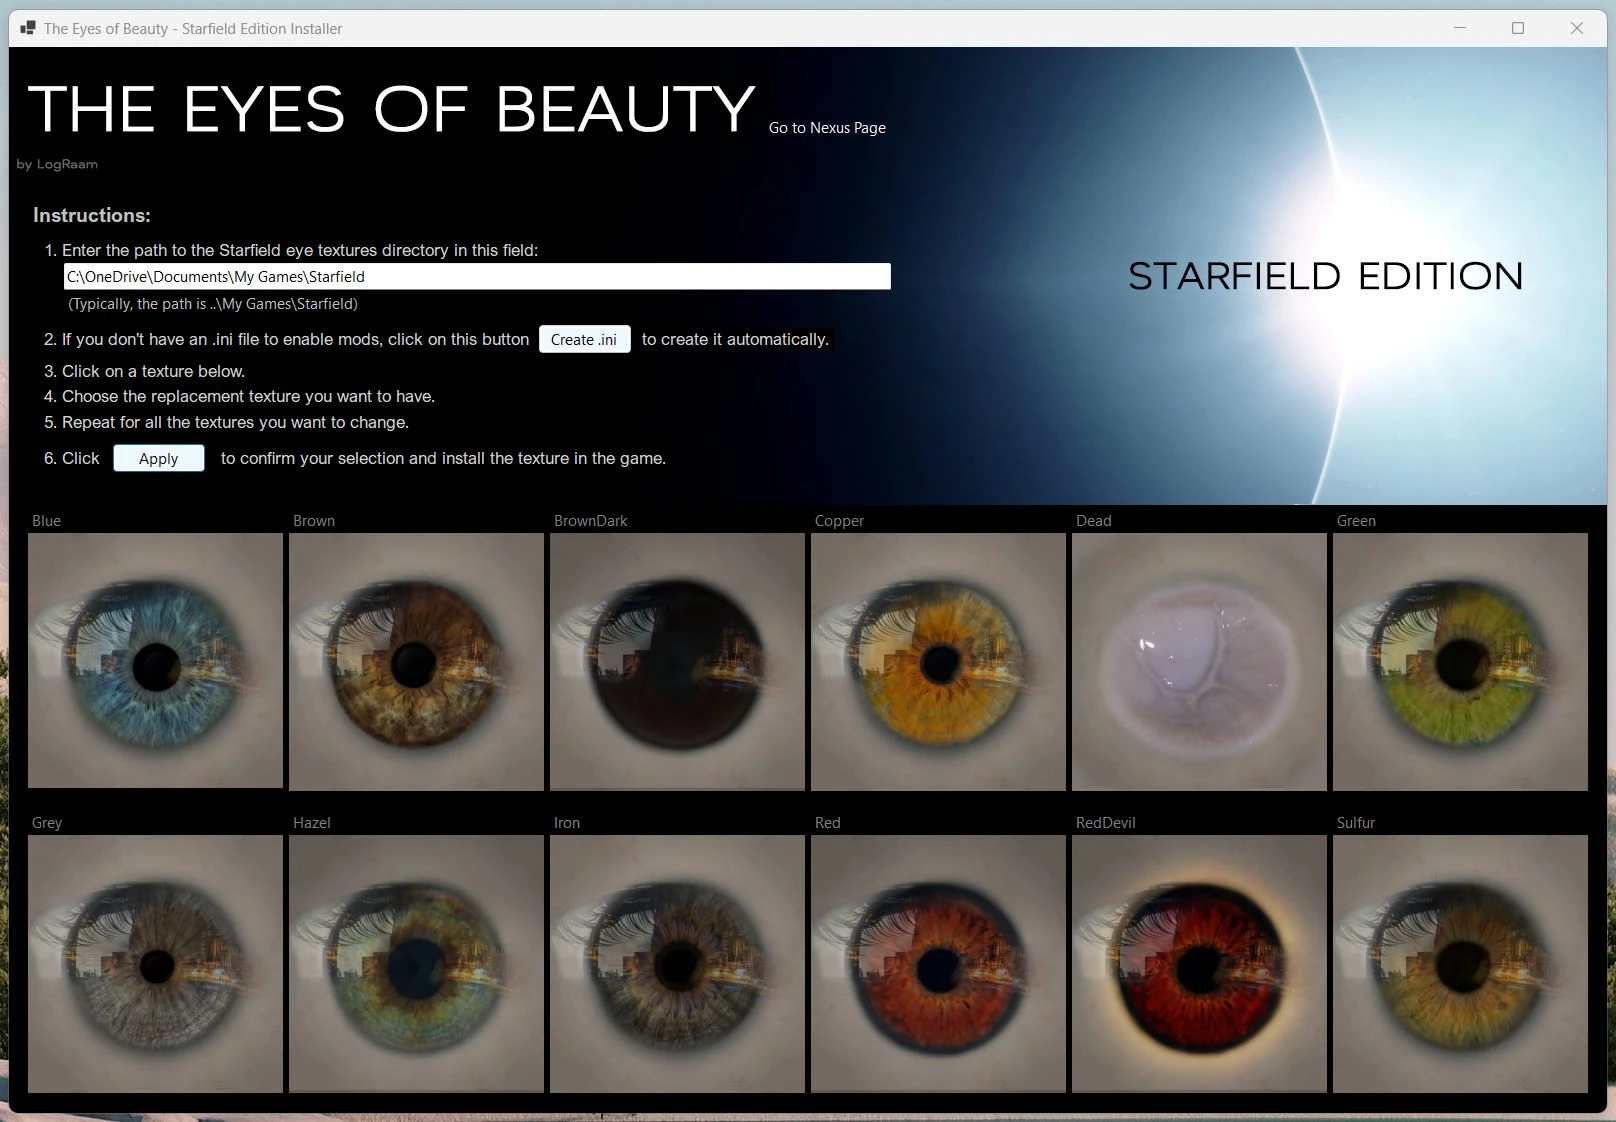
Installation:
The easiest way to install the textures for this mod is to use the Installation tool. This tool will display the game's original textures. Simply follow the steps provided to install the textures you want.
To use the tool, simply download it, extract the archive, and Run the toolThe tool includes all textures from Pack 1, plus some special ones. If you use the tool, you won’t need to download Pack 1 separately.
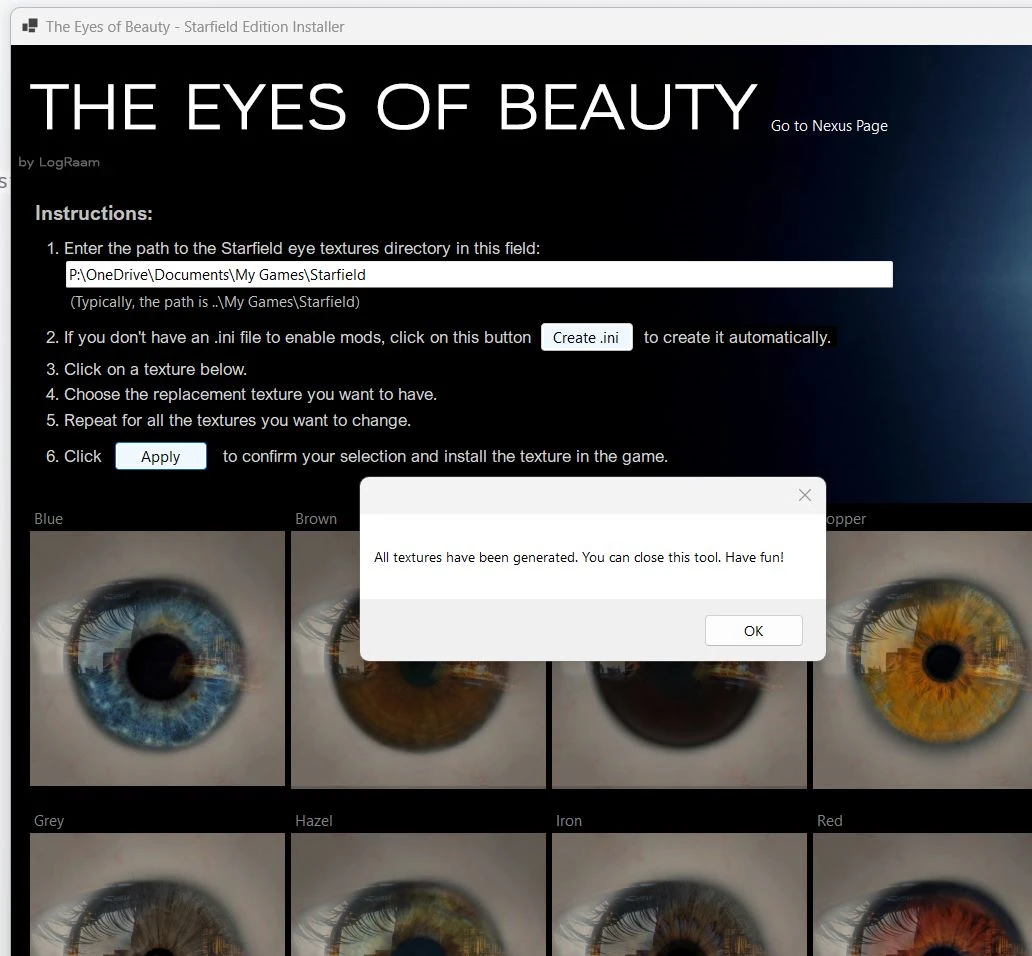
*When applying texture modifications (Apply button), wait for a confirmation popup message indicating that the operation is complete.*
** Sure, I'd be happy to help. Please provide the source text you'd like me to translate.The path to the Starfield eye texturesIt depends on where you installed Starfield. Look for ..\My Games\Starfield\Data\Textures\actors\human\faces\eyes. If that folder doesn't exist, navigate to ..\My Games\Starfield\ and create the missing folders. Then paste the path into the textbox in the first step. Example: P:\OneDrive\Documents\My Games\Starfield\Data\Textures\actors\human\faces\eyes.
Source code can be found here: GitHub repo Feel free to compile it yourself if you prefer, or just review the code to make sure it’s safe.
However, If you don't want to use the tool, you can download the textures from the Optional Files and Old Files sections and install them manually. Follow the steps below.
METHOD 1
**Replacer Pack Manual Installation:**
This will work with Pack 1 Replacer (with or without reflection).
VIDEO: How to Install on PC
You must install this mod manually. To do so, extract the 'Data' folder into..\Documents\My Games\Starfield' (not the game's root folder). If you already have a 'Data' folder there, simply merge it.
You must also have a .ini file named 'StarfieldCustom.ini' in your..\Documents\MyGames\Starfield' directory, in which the following lines should be present:
[Archive]
bInvalidateOlderFiles=1
**sResourceDataDirsFinal=**
If you wish to install an optional texture, you must rename it to an existing in-game file name. For example, to replace the blue eye color with a logo texture, rename the texture file to "iris_blue_color.dds." For now, you'll need to replace an existing in-game texture. Once the official modding tool is released, I'll be able to provide textures as additional options without overwriting the game's original textures.
METHOD 2
Download a texture pack, unzip it, select the textures you want to install, copy them, and rename them to match the game's file names.
This method is the only way to install additional packs (pack 2, pack 3, ...) manually.
Does this work with the Game Pass version?? Yes it does. The ini for loading loose files goes into your source folder for Xbox Game Pass games, while textures go into Documents > My Games > Starfield > Data. (Thanks to SgtDroid01 for the answer).
Is this compatible with Mod Organizer 2? It works — just make sure you're using the beta version of MO2 that supports Starfield as an instance. (thanks to) SneakyEwson (for the answer)
RELEASES
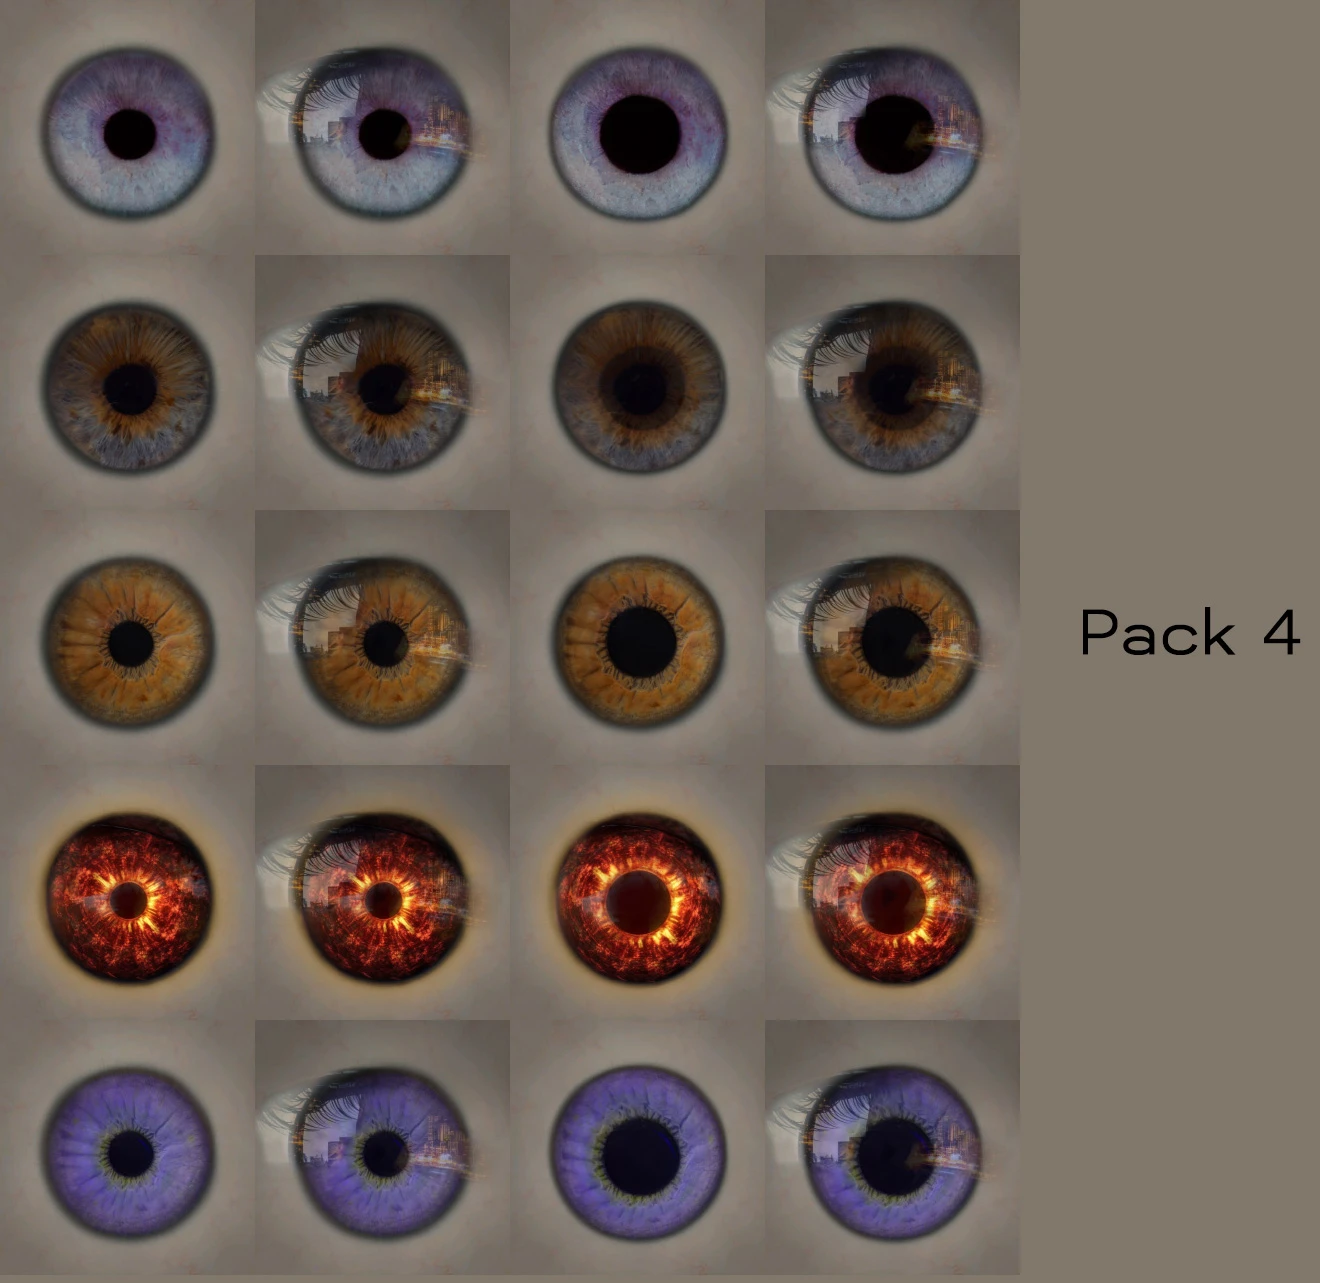
[10/13/2023] Releasing Textures Pack 4. Unzip the archive contents into the Textures folder of the TEOB Installer tool, and the textures will be available when you select a texture replacer.
[10/09/2023] Fixed a bug where installer textures were not saved in the correct location.
[10/09/2023] Update Installer to v1.1.0. I've changed how the text field handles the texture directory path to reduce confusion when configuring the installation tool. Now, the text field will point to whichever directory is entered and generate the selected textures there. This means you can set it to a different directory than the one originally specified by Bethesda.
[2023-10-08] Releasing Textures Pack 3. Unzip the archive contents into the Textures folder of the TEOB Installer tool, and the textures will be available when you select a texture replacer.
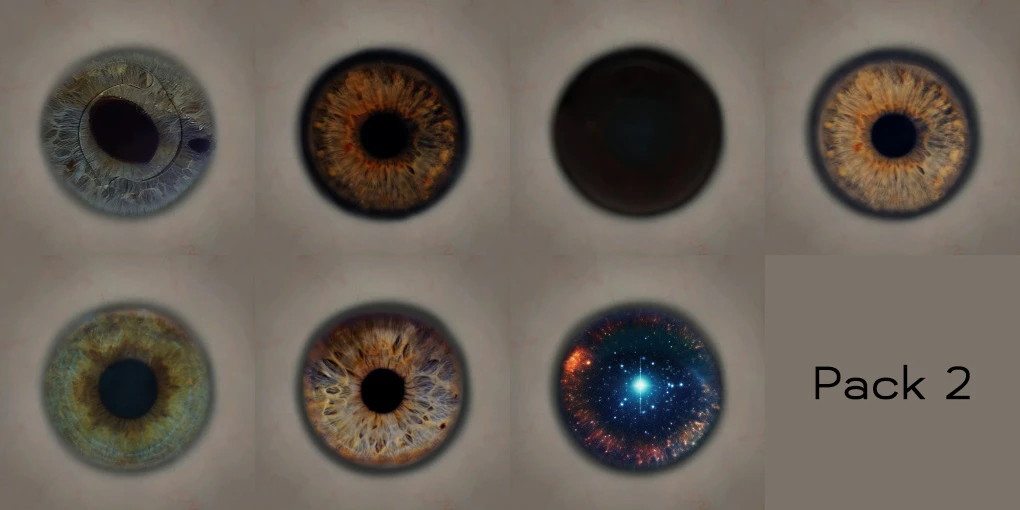
[10/08/2023] Releasing Textures Pack 2. This pack is included in the TEOB Installer.
[10/08/2023] Introducing The Eyes of Beauty Installer for texture replacers.
[10/04/2023] New optional textures available for download. Includes requested dark brown, nearly black iris variants, red and reddevil replacers, GoldenSun, DarkSun, and YellowBlue texture for the yellow iris replacer.
[09/12/2023] New texture based on this page's banner, requested by players. Note: Not realistic, but sure to bring joy to many.
[09/12/2023] I've added two new textures to the optional files section. These were created from photos submitted by Starfield players (Darkprez and Harrycheez). To install them, simply rename the files to match the vanilla textures you want to replace. If you need a list of vanilla texture names, download the archive in the 'old files' section.
[09/05/2023] By player request, I've released a version of the textures without the iris reflection. The archive is available in the "optional" section.
[09/03/2023] The first release includes a set of textures that replace the game's vanilla textures. There are 10 new textures, plus a fix for the sclera opacity.
WORK IN PROGRESS
- Add watermark to vanilla thumbnails when using installer tool. (Contributed by phntsm)
- Creating a new collection for texture replacement (pack 5) WIP;
- Introducing Black Sclera
- Generate 2K version as requested
**Disclaimer:**
Note to modders: I do not authorize the use of textures from this mod in your mods without my permission. Redistributing the original or modified content of this mod is prohibited. This mod is exclusively distributed on Nexus and may not be redistributed on any other website or platform, including Steam. If I grant you permission to use part or all of this mod, you will be required to share 25% to 50% of the Mod Rewards Program points as agreed. Thank you for your understanding and continued cooperation.
Starfield Original Mod
QUICK INSTALLATION GUIDE:
1. Download the TEOB Textures Installer tool. Extract it to a folder of your choice.
2. Download any extra Texture Packs you want from Optional Files, then extract them into the Textures folder of the Installer Tool.
3. Run the installer tool and follow the steps listed.
4. Select the textures you want, then click Apply.
Enjoy!
For this initial version, I offer new eye textures to replace the vanilla ones.
More textures will be added soon.
The textures will be fully integrated into the game once the Creation Kit supports adding new archives. Until then, The Eyes Of Beauty will provide replacement textures.
*This mod fixes the 'blue sclera opacity' effect found on the vanilla eyes.*
Feel free to share your images and videos to show us what this mod brings to your game.
Don't forget to TRACK This mod because it will be regularly updated with new textures.
ABOUT SHARING PRESET WITH TEOB
Yes, of course, you can share your presets using this mod, and I encourage it! The only thing I ask is not to include the textures directly in your archive but rather to provide a link to The Eyes of Beauty so that players can download the textures from this page.
A Note from the Author:
I hope you enjoy the result as much as I enjoyed working on this project.
Installation:
The easiest way to install the textures for this mod is to use the Installation tool. This tool will display the game's original textures. Simply follow the steps provided to install the textures you want.
To use the tool, simply download it, extract the archive, and Run the toolThe tool includes all textures from Pack 1, plus some special ones. If you use the tool, you won’t need to download Pack 1 separately.
*When applying texture modifications (Apply button), wait for a confirmation popup message indicating that the operation is complete.*
** Sure, I'd be happy to help. Please provide the source text you'd like me to translate.The path to the Starfield eye texturesIt depends on where you installed Starfield. Look for ..\My Games\Starfield\Data\Textures\actors\human\faces\eyes. If that folder doesn't exist, navigate to ..\My Games\Starfield\ and create the missing folders. Then paste the path into the textbox in the first step. Example: P:\OneDrive\Documents\My Games\Starfield\Data\Textures\actors\human\faces\eyes.
Source code can be found here: GitHub repo Feel free to compile it yourself if you prefer, or just review the code to make sure it’s safe.
However, If you don't want to use the tool, you can download the textures from the Optional Files and Old Files sections and install them manually. Follow the steps below.
METHOD 1
**Replacer Pack Manual Installation:**
This will work with Pack 1 Replacer (with or without reflection).
VIDEO: How to Install on PC
You must install this mod manually. To do so, extract the 'Data' folder into..\Documents\My Games\Starfield' (not the game's root folder). If you already have a 'Data' folder there, simply merge it.
You must also have a .ini file named 'StarfieldCustom.ini' in your..\Documents\MyGames\Starfield' directory, in which the following lines should be present:
[Archive]
bInvalidateOlderFiles=1
**sResourceDataDirsFinal=**
If you wish to install an optional texture, you must rename it to an existing in-game file name. For example, to replace the blue eye color with a logo texture, rename the texture file to "iris_blue_color.dds." For now, you'll need to replace an existing in-game texture. Once the official modding tool is released, I'll be able to provide textures as additional options without overwriting the game's original textures.
METHOD 2
Download a texture pack, unzip it, select the textures you want to install, copy them, and rename them to match the game's file names.
This method is the only way to install additional packs (pack 2, pack 3, ...) manually.
Does this work with the Game Pass version?? Yes it does. The ini for loading loose files goes into your source folder for Xbox Game Pass games, while textures go into Documents > My Games > Starfield > Data. (Thanks to SgtDroid01 for the answer).
Is this compatible with Mod Organizer 2? It works — just make sure you're using the beta version of MO2 that supports Starfield as an instance. (thanks to) SneakyEwson (for the answer)
RELEASES
[10/13/2023] Releasing Textures Pack 4. Unzip the archive contents into the Textures folder of the TEOB Installer tool, and the textures will be available when you select a texture replacer.
[10/09/2023] Fixed a bug where installer textures were not saved in the correct location.
[10/09/2023] Update Installer to v1.1.0. I've changed how the text field handles the texture directory path to reduce confusion when configuring the installation tool. Now, the text field will point to whichever directory is entered and generate the selected textures there. This means you can set it to a different directory than the one originally specified by Bethesda.
[2023-10-08] Releasing Textures Pack 3. Unzip the archive contents into the Textures folder of the TEOB Installer tool, and the textures will be available when you select a texture replacer.
[10/08/2023] Releasing Textures Pack 2. This pack is included in the TEOB Installer.
[10/08/2023] Introducing The Eyes of Beauty Installer for texture replacers.
[10/04/2023] New optional textures available for download. Includes requested dark brown, nearly black iris variants, red and reddevil replacers, GoldenSun, DarkSun, and YellowBlue texture for the yellow iris replacer.
[09/12/2023] New texture based on this page's banner, requested by players. Note: Not realistic, but sure to bring joy to many.
[09/12/2023] I've added two new textures to the optional files section. These were created from photos submitted by Starfield players (Darkprez and Harrycheez). To install them, simply rename the files to match the vanilla textures you want to replace. If you need a list of vanilla texture names, download the archive in the 'old files' section.
[09/05/2023] By player request, I've released a version of the textures without the iris reflection. The archive is available in the "optional" section.
[09/03/2023] The first release includes a set of textures that replace the game's vanilla textures. There are 10 new textures, plus a fix for the sclera opacity.
WORK IN PROGRESS
- Add watermark to vanilla thumbnails when using installer tool. (Contributed by phntsm)
- Creating a new collection for texture replacement (pack 5) WIP;
- Introducing Black Sclera
- Generate 2K version as requested
**Disclaimer:**
Note to modders: I do not authorize the use of textures from this mod in your mods without my permission. Redistributing the original or modified content of this mod is prohibited. This mod is exclusively distributed on Nexus and may not be redistributed on any other website or platform, including Steam. If I grant you permission to use part or all of this mod, you will be required to share 25% to 50% of the Mod Rewards Program points as agreed. Thank you for your understanding and continued cooperation.
This tool is provided by the third party [bufftool]

Download Mods For Free
Install LagoFast, start Starfield and play with the mods you love.
We use cookies to make interactions with our websites andservices easy and meaningful. For more information aboutthe cookies we use or to find out how you can disable cookies, click here.