Utility mod that provides a standardized auto-startup feature for other mods, support for custom area hub handling, various utilities, and a reusable list menu.
Community Patch - Bootstrap & Utils
Utility mod that provides a standardized auto-startup feature for other mods, support for custom area hub handling, various utilities, and a reusable list menu.
Features for mod users
Simple, standardized way to install mods that support the bootstrap mod without altering vanilla scripts. Note: this does NOT include any major overhaul mods!
Support for custom area hubs from other mods without requiring additional installation or merging.
Includes the engine/telemetryKeyword.ws (once and for all), which is not available in vanilla scripts.
Features for Mod Authors
Provides a standardized way to automatically launch (simple) mods without altering any vanilla scripts.
Provides a standardized way to integrate new custom hubs into mod user installations without requiring additional patching (completely transparent to mod users).
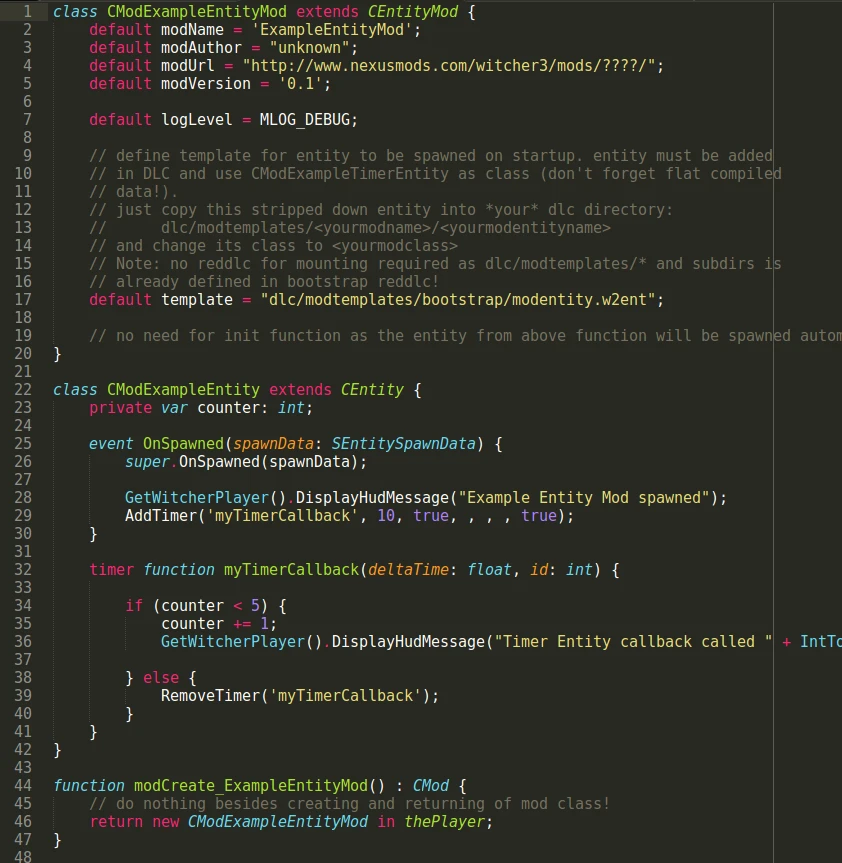
Provides a standard template (and example) for using custom timers without modifying any vanilla scripts.
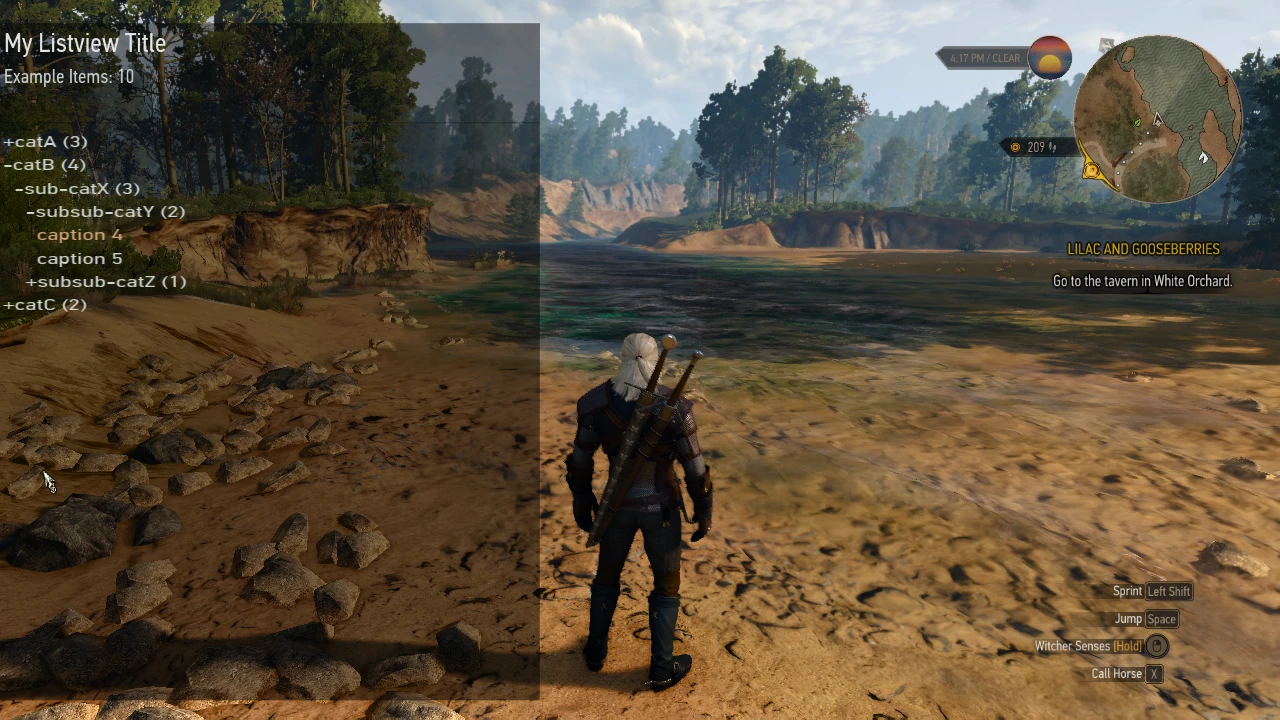
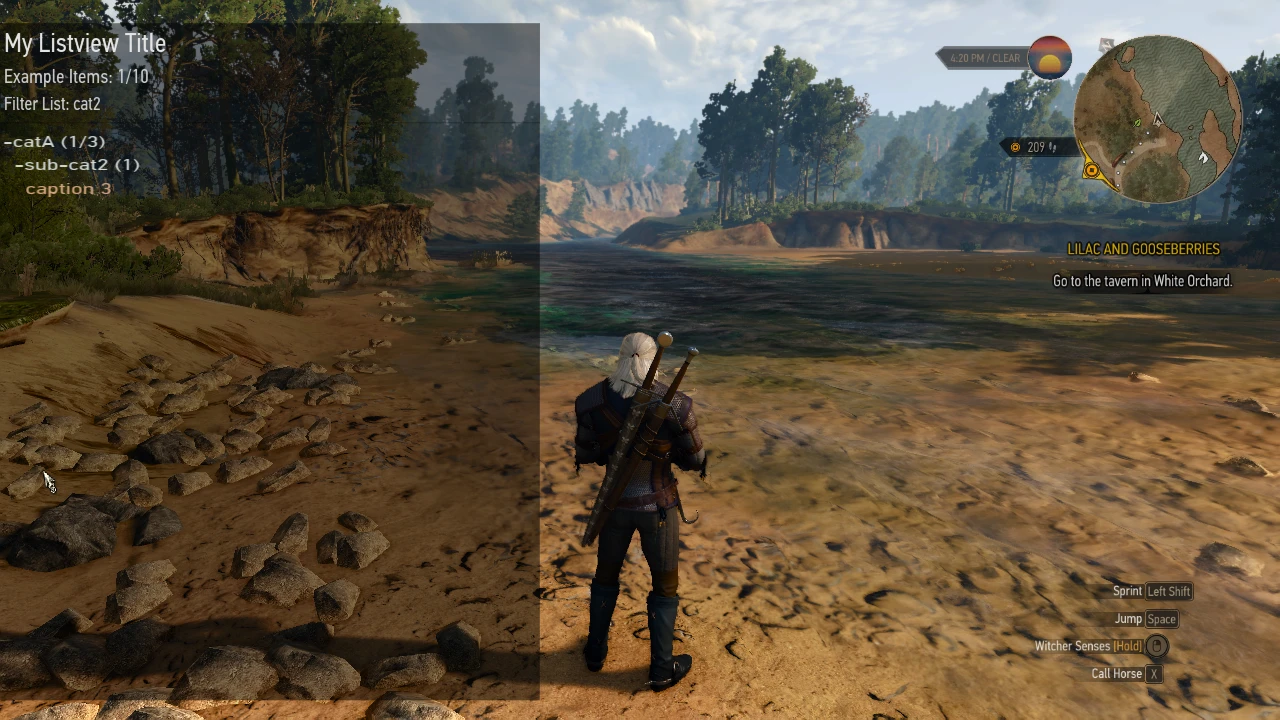
Provides a reusable UI List Menu (and example) for use in mods (see screenshots).
Provides default mounting directories for w2ents (no custom reddlc required).
Provides utility functions for converting between Int and Uint8.
Compatibility The mod is compatible with all game versions 1.30 and above. While the core functionality does not rely on any vanilla scripts, support for custom hubs requires a patch to vanilla scripts. This patch must be installed separately from the bootstrap mod (on which the bootstrap mod depends) and is provided in the files section for a vanilla game installation. However, the authors of the most popular overhaul mods have kindly agreed to include this patch in their mods. In that case, the bootstrap vanilla patch does NOT need to be installed! Check the top sticky forum post for a compatibility list.
Compatibility – How It Works The mod automatically starts by using a minimal, hidden quest each time the game is opened or loaded. No scripthook, piggybacking of entities, or hub layer entities are required, making the mod future-proof for use with additional custom hubs.
To add the new menu, the mod modifies the file gameplay/gui_new/guirsrc/r4default.guiconfig
To add world map support for custom area hubs, the mod modifies these files. gameplay/gui_new/guirsrc/r4map.menu gameplay/gui_new/swf/worldmap/panel_worldmap.redswf (Classic version only)
All mods that modify this file are incompatible with this mod.
How to upgrade from previous versions If you do NOT have a mods/modBootstrap-registry folder in your witcher 3 installation:
1. Back up the file `mods/modBootstrap/content/scripts/local/mods_registry.ws` from your Witcher 3 mods folder. 2. Completely uninstall bootstrap mod (see below) 3. Install the latest version of the Bootstrap mod (see below) 4. Overwrite the file `mods_registry.ws` in the folder `mods/modBootstrap-registry/content/scripts/local/` with your backup from step 1.
otherwise:
1. Uninstall bootstrap mod (see below) but skip step 2 (DO NOT DELETE your modBootstrap-registry folder) 2. Install the newest version of Bootstrap Mod (see below) but skip step 3 (DO NOT install the modBootstrap-registry package).
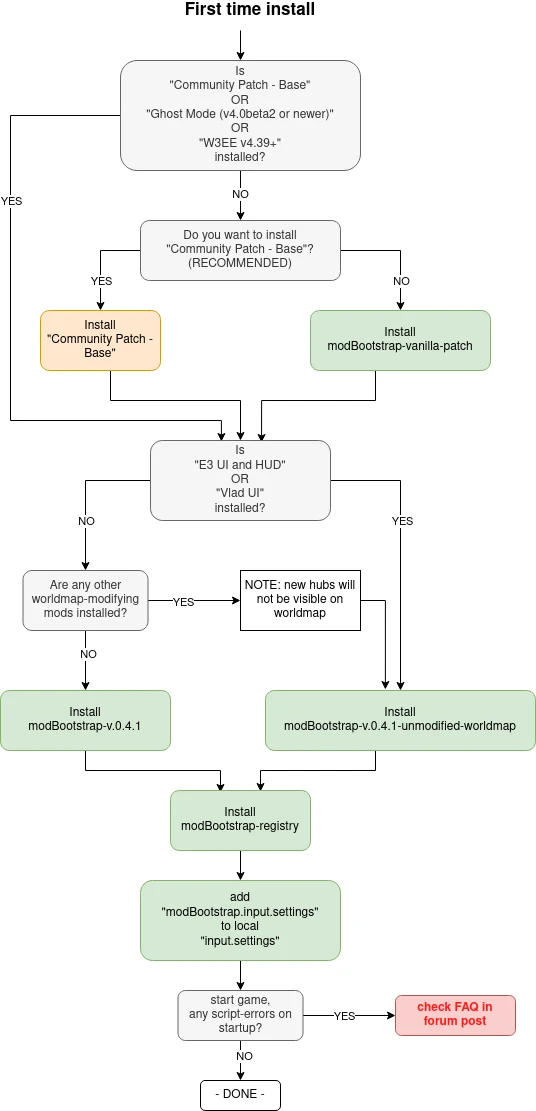
How to Install Check the top, pinned compatibility post in the forum section to see which versions to choose!
**1. It is** **HIGHLY RECOMMENDED** to install the Community Patch - Base mod. This mod already integrates the custom hubs vanilla patch and provides a shared foundation for mod creators and users to build and install their mods with minimal conflicts. If you do not wish to install this mod, check the pinned post to see if the custom hubs patch is required. If the patch is already included in one of your installed mods, proceed directly to step 2; otherwise, download and unzip the modBootstrap-vanilla-patch Copy into your Witcher 3 game directory (so the mod folder contents from the package go into the "mods" folder).
2. Check the sticky post to see what bootstrap package you need to install: Download either the modBootstrap or the modBootstrap-unmodified-worldmap Extract the archive into your Witcher game directory (e.g., the DLC folder from the archive goes into The Witcher 3/DLC, and the mod folder goes into The Witcher 3/Mods).
3. Unzip the **modBootstrap-registry** Copy the mod folder from the package into your Witcher 3 game directory (place the contents of the mod folder into the "mod" folder).
4. Add content from "mods/modBootstrap/modBootstrap.input.settings"from the downloaded package into the input.settings file in your"MyDocuments/The Witcher 3/input.settings"to the end of the file (it will be reordered after startup anyway)
There should be no script conflicts and no merging required. If you get script errors, double-check that you followed the steps as described. If the errors persist, post in the forum section exactly what you did and what specific errors you receive.
Also check the Installation workflow Posted in the image section. If you want to use the Increased Draw Distance mod, check the FAQ 5.1 info in the forum post.
How to check if it's correctly installed
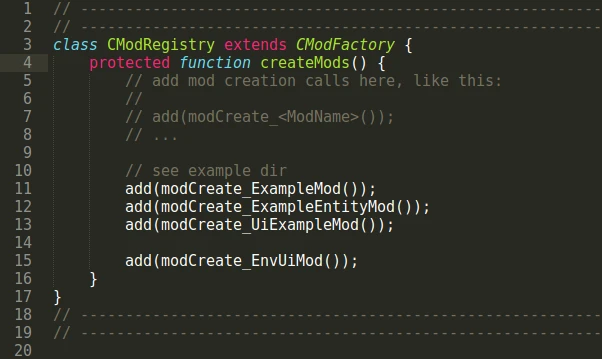
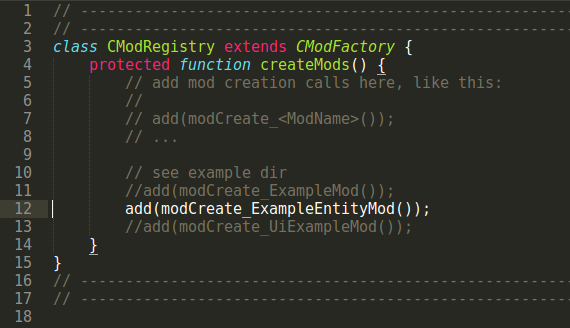
1. Edit the file "mods/modBootstrap-registry/content/scripts/local/mods_registry.wsCheck your W3 game directory and uncomment line 12 as shown in the image below:
2. Load a savegame and make sure your HUD is visible (set "Info messages" in HUD settings), then wait about 10 seconds. You should see a HUD notification similar to the one shown in the image:
3. If the above message is displayed, the mod is working as intended. Re-comment out line 12. Please note: this message will not appear during Ciri's sequences, but if it shows for Geralt, it is working.
How to Uninstall 1. Delete the folders: mods/modBootstrap, mods/modBootstrap-vanilla-patch, and DLC/dlcBootstrap 2. Delete the folder `mods/modBootstrap-registry` 3. Find and delete the section [MOD_UiInput] and all its entries from "MyDocuments/The Witcher 3/input.settings".
**Mod Author Notes** If you add a dependency for this mod, make sure to specify the minimum required version. Future updates to this mod *should* remain backwards compatible, but may introduce new features.
Why would you make this mod a dependency? If you add a custom hub area to your mod and want it to work seamlessly with other custom hubs, world maps, and quest journals without requiring additional patching from your mod users.
If your mod modifies vanilla scripts just to get started or just to get timer functionality - it's not needed anymore. With this, your mod users will have fewer script merge conflicts. See below.
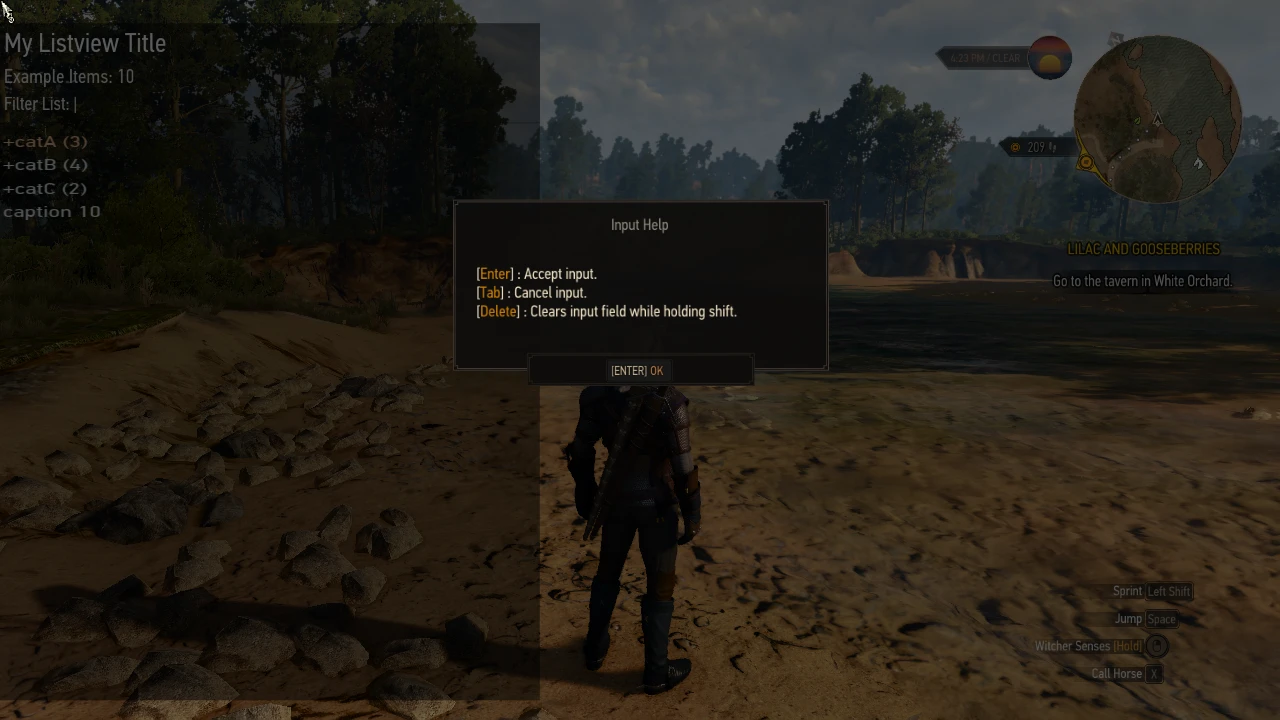
If you want or need to use a list menu in your mod, you don’t have to implement it from scratch. Simply reuse the provided generic list menu. The same applies to the help popup (see UI example).
How to make your mod auto-startup See the modBootstrap/content/scripts/local/example/ Directory for a couple of examples. Starting with v0.5 the recommended method is the xml-item autostart method! The basic idea for the previously registry-based method is as follows:
Your mod startup class must be a subclass of CMod or CEntityMod classes provided by this mod. 2. You must include a simple startup function like this in any of your scripts:
function modCreate_ExampleMod() : CMod { // Do nothing besides creating and returning the mod class! return new CModExampleMod in thePlayer; }
3. You need to add the call to the startup function in the registry function of the bootstrap mod. ```plaintext
mods/modBootstrap/content/scripts/local/mods_registry.ws
```
Your mod users must have modBootstrap installed and only need to complete step three. Make sure to include this instruction in your installation guide.
How to use default mount points The bootstrap mod defines the directory dlc/modtemplates/ and all of its subfolders as entity folders in its reddlc definition. Therefore you can put w2ent files into
within your DLC mod and use them as entities in the game. Make sure to follow this folder structure convention to prevent name collisions with other mods!
How to Use Timers Every script class derived from CEntity can have its own timers, but it must be instantiated in the game (this will be done automatically by the bootstrap mod's autostart).
Create a new class that is a subclass of CEntity, e.g., CMyModEntity. 2. Copy the provided entity template mods/modBootstrap/modentity.w2ent.template Into your entity directory (see above) and rename it accordingly. 3. Edit your mod entity with the Mod Editor: - change the Entity Class Change the CEntityTemplate from CModExampleEntity to CMyModEntity
- Change the Type of the 2nd chunk from CModExampleEntity to CMyModEntity:
- Change the Type of the 1st chunk in the flatCompiledData from CModExampleEntity to CMyModEntity and save it (important!)
**4. See the** mods/modBootstrap/content/scripts/local/example/mod_example_entitymod.ws example for a working example with a timer.
**Credits:** @erxv Modified the UI menu-SWF and patched the world map-SWF. @Aeltoth:for discovering the item-xml autostart method!
This tool is provided by the third party [bufftool]
Download Mods For Free
Install LagoFast, start The Witcher 3: Wild Hunt and play with the mods you love.
We use cookies to make interactions with our websites andservices easy and meaningful. For more information aboutthe cookies we use or to find out how you can disable cookies, click here.


 2. Load a savegame and make sure your HUD is visible (set "Info messages" in HUD settings), then wait about 10 seconds. You should see a HUD notification similar to the one shown in the image:
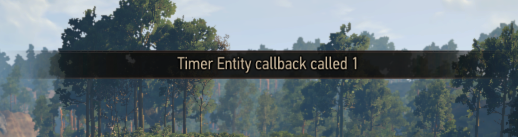 3. If the above message is displayed, the mod is working as intended. Re-comment out line 12. Please note: this message will not appear during Ciri's sequences, but if it shows for Geralt, it is working.
 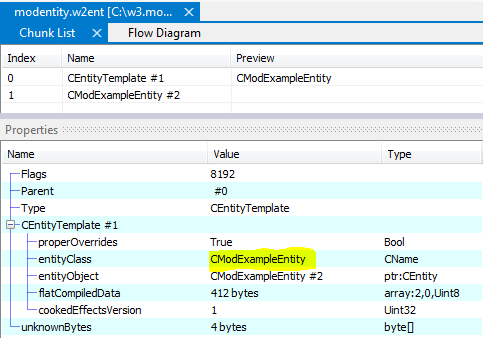 - Change the Type of the 2nd chunk from CModExampleEntity to CMyModEntity:
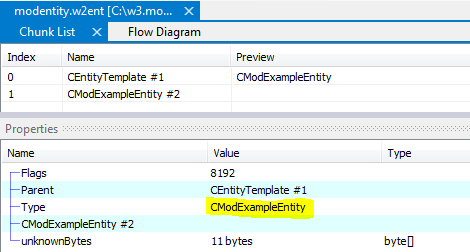 - Change the Type of the 1st chunk in the flatCompiledData from CModExampleEntity to CMyModEntity and save it (important!)
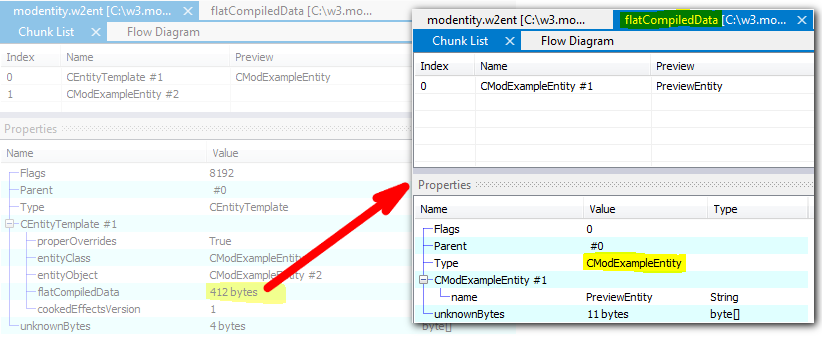 **4. See the** mods/modBootstrap/content/scripts/local/example/mod_example_entitymod.ws example for a working example with a timer.

